3 new features in SpeechKit’s WordPress plugin v3

Please note that this post was published before SpeechKit rebranded to BeyondWords.
We’ve released v3 of the SpeechKit text-to-speech plugin for WordPress, and it’s packed with improvements and new features that make it even easier to engage your audiences with audio. Keep reading or listening to learn what’s new.
Existing user? If you have auto-updates switched on, you’ll already have access to these new features. Otherwise, you’ll need to update the plugin via your WordPress admin.

1. Create audio versions in bulk
You can now create and publish audio for multiple posts at once. This means you can easily make old posts listenable, or add audio to posts you’d previously excluded.
- Open the relevant posts overview section in your WordPress admin ("Posts", "Pages", or a custom post type).
- Use the checkboxes on the left to select which posts you’d like to request audio for (you may need to change your "View mode" in "Screen Options" first).
- Select "Generate audio" from the "Bulk actions" dropdown, then "Apply".
The selected posts will now be processed into audio—this typically takes less than a couple of minutes per post. You can check the status of audios via the SpeechKit sidebar or your SpeechKit dashboard.
Once processed, your audios will be automatically embedded into the corresponding posts via the Small Player (like the one on this post).
2. Check audio responses at a glance
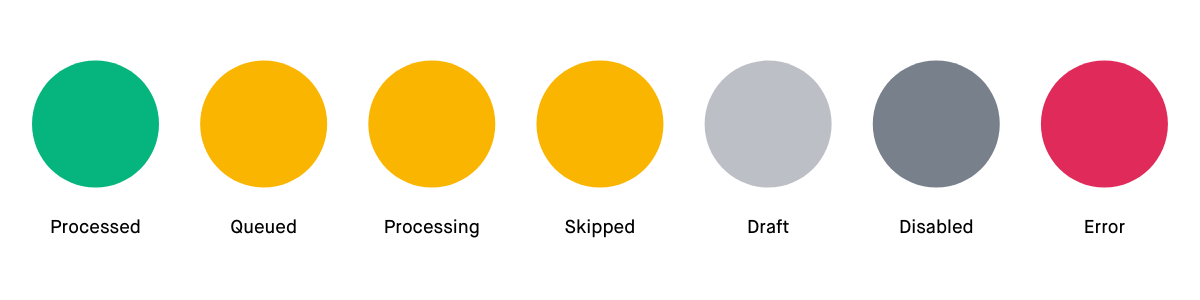
We've replaced the "SpeechKit Status" column in post overview pages with a "SpeechKit" column. This shows you the response from our API—in other words, whether:
- audio has not been requested for the post (–),
- audio has been requested for the post (✓),
- the Player has been disabled on the post (✓ - Disabled), or
- there has been an error (you will see a ! warning symbol with an error code and description).
You can check the status of a particular audio via the SpeechKit sidebar in your post, or via the "Content" section of your SpeechKit dashboard.
Tip: You can also use the SpeechKit sidebar to determine whether or not audio is requested and whether or not the Player is displayed.
3. Easily share debugging data
If you’re having technical difficulties with a particular post, you can now send us the debugging data.
- Open the SpeechKit sidebar on the relevant post.
- Go to "Inspect" then select "Copy".
- Paste the copied details into your message to our support team.
Tip: You can report voice issues via your SpeechKit dashboard. For any other issues, please email us or use the chat function in your dashboard.
Plus much more
We’ve also made a host of other updates to improve the speed, stability, and security of our WordPress plugin. For full details, take a look at our WordPress changelog.